
Karaoke Video Creator
PowerWizard will help you to create your first CD+G karaoke song with Karaoke Video Creator.
The song we will create is Nobody knows you when you're down and out by Jimmy Cox, made famous by Eric Clapton.
Starting PowerWizard
To start PowerWizard click Create New Song Wizard toolbar button ( ). PowerWizard dialog box will appear.

There are two automated paths that can be used with PowerWizard. The first is creating a new karaoke song from lyrics and soundtrack (this is what we are going to do now). The other one is MIDI karaoke import.
By default PowerWizard is configured to run when Karaoke Video Creator starts. You can modify this setting with Run this wizard on program startup checkbox.
To proceed to the next step click Next button.
Soundtrack
The next step will be choosing the soundtrack to use for the song.

To load the soundtrack click Browse button and navigate to the following file:
C:\Program Files\Doblon\Karaoke Video Creator\Examples\nobody knows you.mp3
or
Documents\My Karaoke\Karaoke Video Creator Examples\nobody knows you.mp3 on Windows Vista.
After the file is loaded its name and playback time will displayed in the wizard window. Karaoke Video Creator can use WAV and MP3 files as soundtracks. The soundtrack file needs to be of CD quality (44 kHz stereo).
PowerWizard allows to remove vocals from the song. Our song is an instrumental track, it does not contain vocals, so we will not use Power Vocal Remover. More information on removing vocals can be found in Removing vocals section.
To proceed to the next step click Next button.
Lyrics
Now it is time to provide lyrics for the song.

There are several ways to add lyrics to the song. You may:
•type lyrics in (you may listen to the song as you type -- use Play button to control the playback)
•use web search for lyrics; Karaoke Video Creator automatically opens browser window and runs search using provided details (song title and artist name); more on lyrics search can be found in section Search for lyrics on the web
•paste lyrics from the clipboard (you may select the lyrics in web browser or text editor, copy it, and then paste it into Karaoke Video Creator)
•import lyrics from the text file
In this tutorial we will import the lyrics from the text file. Click Import lyrics from TXT file and open the following file:
C:\Program Files\Doblon\Karaoke Video Creator\Examples\nobody knows you.txt
or
Documents\My Karaoke\Karaoke Video Creator Pro Examples\nobody knows you.txt on Windows Vista.
The lyrics will be displayed -- you may edit them if necessary.
To proceed to the next step click Next button.
Synchronizing lyrics
This step is the most difficult in the whole process of karaoke song creation. You have to synchronize the lyrics to the music.

During synchronization process Karaoke Video Creator highlights words one by one, and your task is to tap the space bar at the moment the word is sung. It is not simple and takes some experience to achieve. To start synchronizing press Start synchronizing button. The first word in the song will become highlighted and the song will start to play.
When the song reaches the highlighted word, press Space key on your keyboard. The highlighting will move to the next word and so on. To mark the end of the word (usually before the long instrumental break) press Ctrl key. When you are done (ie. all words have been synchronized press Enter key or click Done button).
Now you need to check how good job have you done. To do this click Test button and see if the words highlight correctly during playback. Please note that if you have not done perfect job you may adjust synchronization later (see Adjusting synchronization section).
As you have probably noticed synchronizing lyrics is not an easy task. Here are hints that can make your life easier:
•use speed control to decrease the playback speed; if you select 0.5 the playback will be two times slower
•use Go Back button if you miss the beat; Rewind buttons rewinds the playback, but does not move highlighting
•if you are working on a new song, synchronize it from start till end, and then do it once more; second pass will be much better
•see Advanced synchronization for synchronization tips
To proceed to the next step click Next button.
Wizard is done
The wizard is complete -- most of the work is done.

You are left with three choices now. You may:
•Apply a visual style to the song -- this button will open Styles dialog that will allow you to use one of song templates
•Adjust synchronization or edit the song -- choosing this option will let you to fine tune the song, edit lyrics, or fix synchronization errors
•Create video file will take you directly to video file creation
To continue with this tutorial click Adjust synchronization or edit song button.
If Save the song before continuing is checked, you will be prompted to save the song. Karaoke Video Creator saves song in PK2 files. Note that saving files is disabled in demo mode.
Karaoke Video Creator main window
Now it is a good time to learn about the main window of Karaoke Video Creator.

On the top you see common Windows interface items -- menu bar and toolbar.
Left side of the window is occupied by the soundtrack panel. It displays a waveform of the current soundtrack, and on top of it labels that correspond to the synchronized words. More information on using it can be found in Using the soundtrack panel section.
Right side of the window contains the shortcut bar. It contains shortcuts to most frequently used commands. Shortcut bar changes with context -- if you do not need it any more you may close (to display it again use Shortcut bar command from View menu). To leave the shortcut bar visible, but to disable animations, select Preferences from File menu and uncheck Animate shortcut bar option.
The main area of the screen is taken by the lyrics editor. It consists of two parts -- preview window on the top (you may close is with Preview toolbar button  ) and lyrics area below.
Preview window displays the preview of the current part of the lyrics -- this is how the lyrics will look on the TV screen. If your computer is slow, rendering preview make take a long time and your work will be uncomfortable. To avoid this either hide the preview window or disable automatic updates (clicking Update button will render the preview at the current cursor position). Video preview button open Preview window which is a real-time video preview.
NOTE: Preview window and Video Preview do not show images nor backgrounds.
Lyrics area allows to edit the lyrics text, insert events, and adjust synchronization of the words.
Styles
Now it would be a good time to make our song look better. We will do this using style templates.
To apply a predefined visual style to your song click Styles button on the toolbar ( ) or select Styles command from Create menu.

Song details section of the dialog box allows you to enter title of the song, artist name, and text that will be displayed as your company information (probably something like Presented to you by DOBLON). Credits are displayed after the song is finished.
| Tip: To force a new line in Title, Artist, or Company name fields, use ^ character. |
What is style?
Karaoke Video Creator allows to set styles for:
•Title: image displayed before the song starts
•Credits: image displayed after the song is finished
•Song: colors, text formatting, page layout, and background image
Each of this styles can be applied individually, or it is possible to use presets.
Style preset combo box allows to select one of predefined templates. It will change all styles in Applied styles. You may store your combination of Title, Song, and Credit styles using Add button. To save changed combination use Save button. Delete button removes your preset from the list.
Applied styles lists styles used for each of the sections of the song. To change the style select it in Applied styles list and then choose the new style from Available styles combo. Selecting (Unused) will disable the style.
Style editor button starts Style Editor dialog box which allows you to create your own styles.
Preview window displays the preview of the style selected in Applied styles list.
Selected styles will be applied to the song when you select OK button.
To continue with the tutorial select Rock style preset and click OK button.
Adjust Parameters
Usually you will want to adjust video parameters to your liking. To open Video Settings dialog box click Video Settings button on the toolbar ( ) or select Video Settings command from Create menu.

To learn more about Video Settings dialog box see Modifying Video settings section.
When you are satisfied with the way text looks click OK.
Create Video File
Now we are ready to create video file.
Click Create Video File button on the toolbar ( ) or select Create Video File command from Create menu. You may also press F2 key on the keyboard.
Input/Output
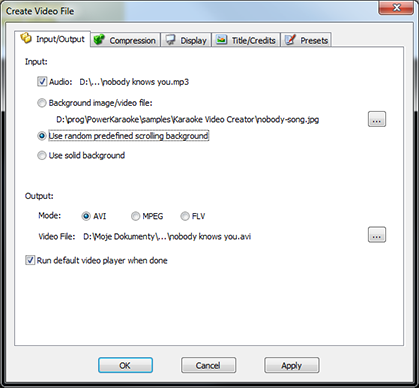
Input
Here you can define the audio track that will be used in the video and choose the background image or video.
There are three possible options for background. You may use a video or image file of your choice, you may use one of the predefined scrolling backgrounds (they are located in %APPDATA%/Doblon/Karaoke Video Creator/Backgrounds folder), or you may use a solid background.
Output
This defines the location of video file that will be created. You may choose the format of the video:
AVI |
Windows video file format. Use to play on computer or on DivX-capable players |
MPEG |
Universal video format. Use for DVD creation and iPod and iPhone files |
FLV |
Flash video. Use for web |
If Run default video player when done Karaoke Video Creator will open the newly created file and play it using system's default player for AVI files..
Compression
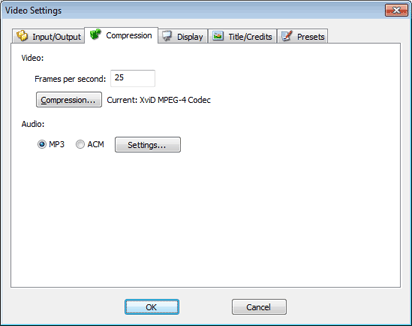
Video
This section defines video compression and frame rate. Compression button allows to choose from video encoders that are installed in the system.
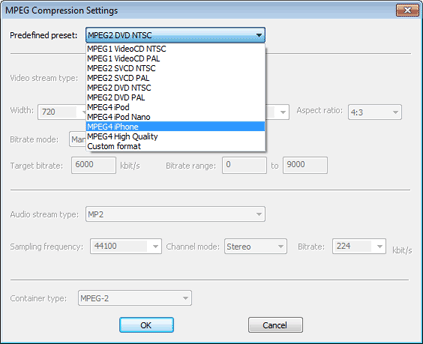
With MPEG encoding selected you may choose one of the predefined MPEG encoding presets (VideoCD, DVD, iPod, iPhone) or choose custom format and adjust all encoding parameters.
Audio
Choosing MP3 will result in audio channel encoded to MP3. You may change MP3 encoding parameters with Settings button.
Choosing ACM allows to choose from Audio Compression Manager codecs installed on your computer. Use Settings button to select the encoder and adjust the parameters.
Display
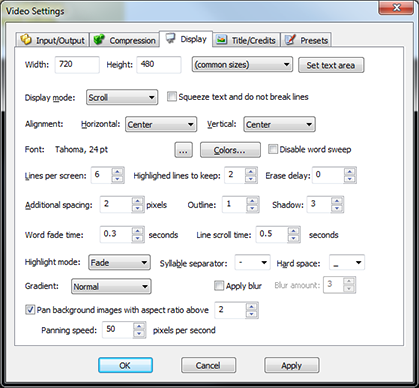
Width/Height
Defines the resolution of the created video. Set text area button allows to define which part of the video should be used to display lyrics. You may use Common sizes list to quickly select one of common resolutions.
Display mode
You may also select the text display mode. Choosing Page by page will result in the standard paged display. Overwrite will disable the screen erasing and the new words will overwrite the already sang. And Scrolled mode will generate the long flow of text that will move upwards with the highlighted line always in the middle.
Mode information on display modes can be found in Display modes section.
Squeeze text and do not break lines
When this option is selected Karaoke Video Creator will not break lines -- it will resize it horizontally so every line fits the screen. This may help placing the text in the song, but if the lines are too long may decrease the readability of the text.
Vertical alignment
Allows to change the placement of the lines of the text. You may select Center, Top, or Bottom which would place the text at the appropriate part of the screen, or choose Space evenly, which makes sure that the first line is at the top, the last at the bottom, and all the spaces between the lines are equal.
Horizontal alignment
This setting controls the way the individual lines of text are placed. You have the choice of Center, Left, and Right.
Font
This setting specifies which font will be used for the lyrics and how large the letters should be. If you are trading you PK2 files make sure that you use fonts that are installed on the destination computer.
Colors
Allows to change the background, border and text color. Simply choose the appropriate color from the list or use More button to select the custom color.
Lines per screen
Allows to specify the maximum number of lines to be shown. Note that if the font size is too large, the actual number of lines may be lower.
Number of highlighted lines to keep
If using scrolling or overwrite display mode this parameter controls the number of lines that have already been sung but are not erased yet.
Additional spacing
The number of pixels to insert between the lines.
Outline/Shadow
This values control the effect added to the text. Setting them to zero disables the effect. The color of the text effects can be set in Colors dialog box.
Word fade time
To make the video look better words are faded in when displaying and faded out when erasing. This value controls the time fade takes.
Line scroll time
This value defines the time used to scroll the lyrics in scrolling display mode.
Highlight mode
Here you can select whether word should be simply swept with the color or somewhat nicer 'fade' effect should be used.
Syllable separator
Allows to select the character that separates syllables in the song text. By default the syllable separator is a hyphen (-).
Hard space
This option allows to change the default character that will be displayed as a space, but does not split the word (e.g. hard_space will be treated as a single word). By default the hard space character is an underline (_).
Gradient
To make the lyrics look better %APPNAME% applies gradient effect to the text it displays. This setting allows to control the intensity of the effect.
Apply blur
If you would like to blur the final image, you may define the level of blur to apply.
Pan background images with aspect ratio above X
If an image selected for the background is at least twice as wide as it is tall, %APPNAME% will scroll it from left to right and back. This creates a very nice visual effect. You may define the speed of the animation. We have provided a set of wide images to use as backgrounds, they are installed with the program.
Title/Credits
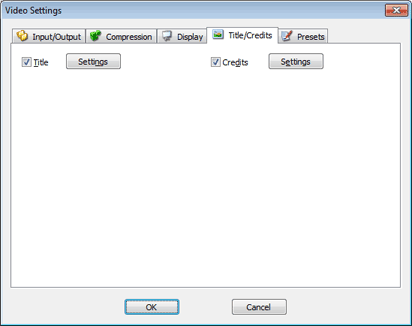
This group of options allows to select the pictures that are to appear before the song and after the song. By default these pictures are disabled.
To learn more about using images in Karaoke Video Creator see Images section.
Presets

You may save a current set of options and use it later for different song using the Save button. To invoke the preset select if from a pop-down list. To delete the existing preset use Delete button.
If you would like to use current settings every time you start the program, click Use current as default button. You may also revert to this saved default settings using Reset to default button. It is also possible to revert settings to factory defaults.
Playing karaoke videos
Karaoke Video Creator creates regular AVI files that can be played with any multimedia player on your system (including Windows Media Player) and on some standalone players (usually with DivX capability). You can also use Karaoke DVD Burner to create a DVD disc from your videos.
